Thursday, May 2, 2024

Kubernetes learning Approach


To learn Kubernetes effectively, you should focus on a structured approach that covers both foundational concepts and hands-on experience. Below is a breakdown of the key areas and topics to focus on:

1. Basic Concepts of Containers and Orchestration

  • Containers: Understand Docker and containerization. Learn how containers are created, how images are built, and how they differ from traditional VMs.
  • Container Orchestration: Learn why orchestration is necessary and how Kubernetes solves problems like scalability, high availability, and automated management of containerized applications.

2. Kubernetes Architecture

  • Nodes and Clusters: Learn how Kubernetes clusters are organized into nodes (worker nodes and master nodes).
  • Control Plane: Understand the components of the control plane (API server, scheduler, etcd, controller manager).
  • Worker Node Components: Learn about kubelet, kube-proxy, and container runtime.

3. Core Kubernetes Components

  • Pods: The smallest deployable units in Kubernetes.
  • Services: Exposing your application to other services or external traffic (ClusterIP, NodePort, LoadBalancer).
  • Deployments: Handling application updates and scaling.
  • ReplicaSets: Ensuring the desired number of pod replicas are running.
  • Namespaces: Logical isolation of Kubernetes resources.

4. Networking in Kubernetes

  • Cluster Networking: Understand how containers communicate inside the cluster using CNI (Container Network Interface).
  • Service Discovery: Learn how services use DNS to find each other.
  • Ingress: Exposing HTTP and HTTPS routes outside the cluster with an ingress controller.

5. Storage and Volumes

  • Persistent Volumes (PVs): Managing storage that exists beyond the lifecycle of pods.
  • Persistent Volume Claims (PVCs): Requesting storage resources dynamically.
  • Storage Classes: Different storage provisioning types and policies.

6. Managing Configurations and Secrets

  • ConfigMaps: Manage environment-specific configuration.
  • Secrets: Store sensitive information securely.

7. Scaling and Self-healing

  • Horizontal Pod Autoscaling (HPA): Automatically scale the number of pods based on CPU or custom metrics.
  • Vertical Pod Autoscaling (VPA): Automatically adjust the CPU and memory requests for containers.
  • Self-healing: How Kubernetes automatically restarts failed containers and replaces unresponsive nodes.

8. Kubernetes Security

  • RBAC (Role-Based Access Control): Fine-grained access control.
  • Service Accounts: Handling authentication within pods.
  • Network Policies: Control traffic between different pods.

9. Helm and Kubernetes Package Management

  • Learn Helm for managing Kubernetes applications with charts (preconfigured Kubernetes resources).
  • Understand how Helm simplifies the deployment, upgrade, and rollback of applications.

10. Monitoring and Logging

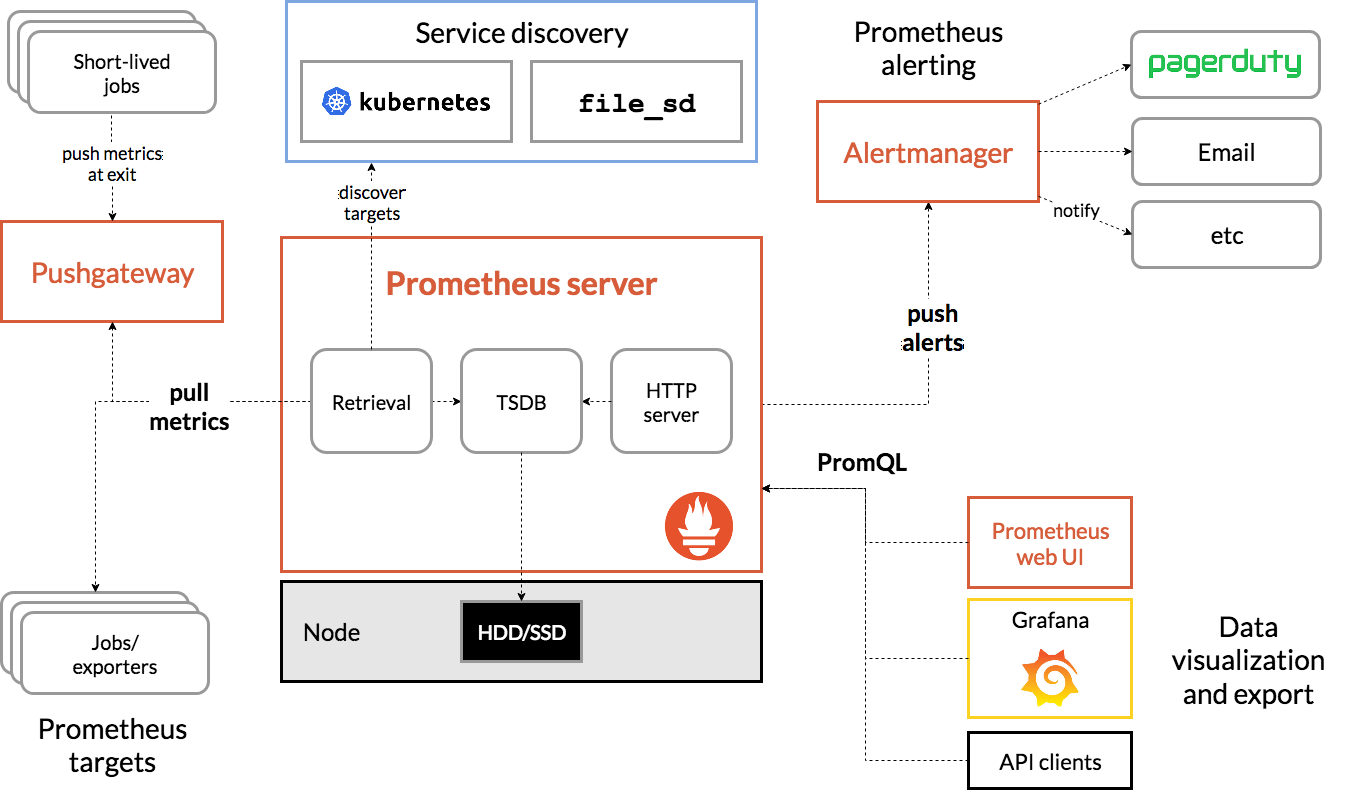
  • Monitoring: Tools like Prometheus for real-time monitoring of the cluster.
  • Logging: Tools like Fluentd or ELK Stack (Elasticsearch, Logstash, Kibana) for logging and aggregation.

11. Kubernetes Workflows and CI/CD

  • Learn how to integrate Kubernetes with CI/CD pipelines (using tools like Jenkins, GitLab, or ArgoCD).
  • Automated testing, deployment, and rollback strategies.

12. Kubernetes Operators and Custom Resource Definitions (CRDs)

  • Operators: Extend Kubernetes functionalities by automating complex tasks.
  • Custom Resource Definitions: Define custom APIs for Kubernetes to manage.

13. Hands-On Practice

  • Minikube: Set up a local Kubernetes cluster.
  • kubectl: Learn the CLI tool to interact with the cluster (get pods, services, deploy apps).
  • Cloud Providers: Experiment with managed Kubernetes services like Google Kubernetes Engine (GKE), Amazon EKS, or Azure AKS.

Learning Resources:

  • Official Kubernetes Documentation: Great for in-depth and up-to-date knowledge.
  • Kubernetes Tutorials: Websites like Katacoda, Kubernetes the Hard Way (by Kelsey Hightower), and Labs from cloud providers.
  • Books: "Kubernetes Up & Running" and "The Kubernetes Book".
  • Courses: Platforms like Coursera, Udemy, and Pluralsight offer Kubernetes courses.

By following these steps and building projects along the way, you’ll develop a solid understanding of Kubernetes.

Friday, March 8, 2024

Gtk-Message: 21:23:41.751: Not loading module

 Error message: he message you're seeing:

Gtk-Message: 21:23:41.751: Not loading module "atk-bridge": The functionality is provided by GTK natively. Please try to not load it.

FIX:- 

indicates that the atk-bridge module is no longer necessary for your version of GTK, as the functionality it provides is now built into GTK itself. This is more of an informational or warning message rather than an error, and your application should still run fine without any issues.

However, if you'd like to suppress this message or resolve it for a cleaner output, here are some approaches:

1. Ensure Dependencies Are Up-to-Date

Make sure you have the latest versions of GTK and its related packages:

 sudo apt update
sudo apt upgrade

You can also specifically update GTK and ATK packages (on Ubuntu/Debian):

sudo apt install --reinstall libgtk-3-0 at-spi2-core libatk-adaptor
 

2. Unset GTK Modules Environment Variable (Suppress Message)

The message might be triggered because the GTK_MODULES environment variable includes atk-bridge. You can suppress this by unsetting the variable.

Run the following command in your terminal before launching your application:

unset GTK_MODULES
 

To make this change permanent, you can add the command to your .bashrc or .bash_profile:

echo "unset GTK_MODULES" >> ~/.bashrc
source ~/.bashrc
 

3. Check for Old Configurations

Some applications or configurations may explicitly load unnecessary modules. Look for any GTK or atk-bridge settings that might be outdated in the following locations:

  • ~/.config/gtk-3.0/settings.ini
  • /etc/gtk-3.0/settings.ini

You may not find this file, but if you do, ensure there’s no manual loading of atk-bridge.

4. Install Accessibility Bridge (Optional)

If you still want to install the atk-bridge module (even though it's not necessary), you can do so with:

sudo apt install at-spi2-core
 

5. Suppress the Warning in Output (Advanced)

If you're running a script or an application that logs GTK messages and you want to suppress this specific message, you can redirect the output using grep or sed.

Example:

your-application 2>&1 | grep -v "Not loading module 'atk-bridge'"
 

These steps should help either resolve or suppress the atk-bridge message depending on your preference. If the message is just cosmetic and not affecting functionality, you can safely ignore it.


Friday, March 1, 2024

Install Prometheus in Minikube using Helm

To install Prometheus in Minikube using Helm, follow these step-by-step instructions. This process assumes that you already have Minikube and Helm installed.

Prerequisites:

  1. Minikube installed on your machine. Minikube Installation Guide
  2. kubectl installed and configured. kubectl Installation Guide
  3. Helm installed on your machine. Helm Installation Guide

Step-by-Step Installation

Step 1: Start Minikube

Start your Minikube cluster:

 minikube start


Wait for Minikube to start, and check the status:

 minikube status

Step 2: Add Helm Repository for Prometheus

Helm provides a stable repository that contains Prometheus charts. First, add the prometheus-community repository:

 helm repo add prometheus-community https://prometheus-community.github.io/helm-charts

Update your Helm repository to make sure everything is up-to-date:

 helm repo update

Step 3: Create a Namespace for Monitoring

Create a dedicated namespace for Prometheus (e.g., monitoring):

 kubectl create namespace monitoring

Step 4: Install Prometheus Using Helm

Now, use Helm to install Prometheus. You will use the Prometheus chart from the prometheus-community repository.

helm install prometheus prometheus-community/prometheus --namespace monitoring
 

This command will:

  • Install the Prometheus chart from the prometheus-community Helm repo.
  • Use the namespace monitoring for the Prometheus components.

Step 5: Verify the Installation

Check the resources created in the monitoring namespace:

kubectl get all -n monitoring
 

You should see several resources such as pods, services, deployments, statefulsets, etc.

Step 6: Access the Prometheus UI

To access the Prometheus UI, we will use Minikube’s service tunneling feature. Run the following command to get the service URL:

minikube service prometheus-server -n monitoring
 

This will launch a browser window to access Prometheus.

If you want to expose the Prometheus UI via port forwarding, you can run:

helm uninstall prometheus --namespace monitoring
 

You can also delete the monitoring namespace if you no longer need it:

kubectl delete namespace monitoring


Friday, February 2, 2024

Custom Resource Definitions (CRDs) in Kubernetes

To install Custom Resource Definitions (CRDs) in Kubernetes, you typically define them in a YAML file and then apply that file using kubectl. CRDs allow you to extend the Kubernetes API by defining your own resources.

Here’s a step-by-step guide to install CRDs:

Step 1: Create a CRD YAML File

Create a YAML file that defines your CRD. Below is an example of a CRD YAML definition for a MyCustomResource:


apiVersion: apiextensions.k8s.io/v1
kind: CustomResourceDefinition
metadata:
  name: mycustomresources.mygroup.example.com
spec:
  group: mygroup.example.com
  versions:
    - name: v1
      served: true
      storage: true
      schema:
        openAPIV3Schema:
          type: object
          properties:
            spec:
              type: object
              properties:
                someField:
                  type: string
  scope: Namespaced
  names:
    plural: mycustomresources
    singular: mycustomresource
    kind: MyCustomResource
    shortNames:
      - mcr

This defines a CRD called MyCustomResource, which is scoped to a namespace and has a field someField.

Step 2: Install the CRD using kubectl

Once you’ve defined your CRD YAML file, you can install it using the kubectl command. Assuming the file is called mycustomresource-crd.yaml, you can install it like this:

kubectl apply -f mycustomresource-crd.yaml
 

Step 3: Verify the CRD is Installed

To verify the CRD has been installed successfully, you can use:

kubectl get crds

 You should see mycustomresources.mygroup.example.com in the list of CRDs.

Step 4: Create Custom Resources

Once the CRD is installed, you can now create Custom Resources (CRs) based on that CRD. Here’s an example of a custom resource using the CRD:

apiVersion: mygroup.example.com/v1
kind: MyCustomResource
metadata:
  name: my-custom-resource-instance
spec:
  someField: "Some value"


To create this custom resource, save the YAML to a file (e.g., my-custom-resource.yaml) and apply it:

 kubectl apply -f my-custom-resource.yaml

Thursday, January 11, 2024

Deploying a Simple Web Application with Helm

 Kubernetes package management with Helm is a powerful way to manage Kubernetes applications. Helm helps you define, install, and upgrade even the most complex Kubernetes applications using Helm charts. Here’s a comprehensive example to illustrate how you can use Helm for package management.

Example: Deploying a Simple Web Application with Helm

1. Install Helm

Before you begin, ensure you have Helm installed. You can install Helm using the following command:

curl https://raw.githubusercontent.com/helm/helm/main/scripts/get-helm-3 | bash

Verify the installation:


helm version

2. Create a Helm Chart

To create a new Helm chart for your application, use the following command:


helm create my-web-app

This command creates a new directory named my-web-app with a basic Helm chart structure:


my-web-app/ ├── .helmignore ├── Chart.yaml ├── values.yaml ├── charts/ ├── templates/ │ ├── deployment.yaml │ ├── service.yaml │ ├── ingress.yaml │ └── _helpers.tpl └── templates/tests/

3. Customize the Chart

Edit the Chart.yaml file to define your chart’s metadata:


apiVersion: v2 name: my-web-app description: A Helm chart for deploying a simple web application version: 0.1.0 appVersion: "1.0"

Update the values.yaml file to configure default values for your application:


replicaCount: 1 image: repository: nginx pullPolicy: IfNotPresent tag: "latest" service: type: ClusterIP port: 80 ingress: enabled: false name: "" annotations: {} path: / hosts: - host: chart-example.local paths: [] tls: []

Edit templates/deployment.yaml to define your application’s deployment:


apiVersion: apps/v1 kind: Deployment metadata: name: {{ include "my-web-app.fullname" . }} labels: app: {{ include "my-web-app.name" . }} chart: {{ .Chart.Name }}-{{ .Chart.Version }} spec: replicas: {{ .Values.replicaCount }} selector: matchLabels: app: {{ include "my-web-app.name" . }} template: metadata: labels: app: {{ include "my-web-app.name" . }} spec: containers: - name: {{ .Chart.Name }} image: "{{ .Values.image.repository }}:{{ .Values.image.tag }}" imagePullPolicy: {{ .Values.image.pullPolicy }} ports: - name: http containerPort: 80

Edit templates/service.yaml to define your service:


apiVersion: v1 kind: Service metadata: name: {{ include "my-web-app.fullname" . }} labels: app: {{ include "my-web-app.name" . }} chart: {{ .Chart.Name }}-{{ .Chart.Version }} spec: type: {{ .Values.service.type }} ports: - port: {{ .Values.service.port }} targetPort: http selector: app: {{ include "my-web-app.name" . }}

4. Package the Chart

To package your Helm chart into a .tgz file, use the following command:


helm package my-web-app

This creates a my-web-app-0.1.0.tgz file that you can distribute or upload to a Helm repository.

5. Install the Chart

To install your chart into a Kubernetes cluster, use the following command:


helm install my-web-app ./my-web-app-0.1.0.tgz

To specify custom values during installation, use:


helm install my-web-app ./my-web-app-0.1.0.tgz --values custom-values.yaml

6. Upgrade the Chart

To upgrade your release with new chart changes, use:


helm upgrade my-web-app ./my-web-app-0.1.0.tgz

7. Uninstall the Chart

To remove the deployed release, use:


helm uninstall my-web-app

8. Helm Repositories

You can also use Helm repositories to manage and share charts. To add a Helm repository:


helm repo add bitnami https://charts.bitnami.com/bitnami helm repo update

To search for charts in the repository:


helm search repo bitnami

To install a chart from a repository:


helm install my-web-app bitnami/nginx

Summary

  • Helm Charts are used to define, install, and upgrade Kubernetes applications.
  • Helm allows you to package, configure, and deploy applications with a single command.
  • Charts consist of templates and values to customize the Kubernetes manifests for your application.

By following these steps, you can effectively manage Kubernetes applications using Helm, making it easier to deploy, update, and maintain complex applications in a Kubernetes environment.

Thursday, January 4, 2024

Docker concepts and commands

Here’s a comprehensive guide to Docker concepts and commands, complete with explanations to help you understand each one.

1. Basic Docker Commands

1.1. Check Docker Version


docker --version

Explanation: This command displays the installed Docker version. It's useful for verifying that Docker is installed and checking its version.

1.2. List Running Containers


docker ps

Explanation: Lists all currently running containers. By default, it shows the container ID, image, command, creation time, status, ports, and names.

1.3. List All Containers (including stopped ones)


docker ps -a

Explanation: Lists all containers, both running and stopped. This helps in managing and inspecting containers that are not currently active.

1.4. Pull an Image from Docker Hub


docker pull nginx

Explanation: Downloads the nginx image from Docker Hub (the default image repository). If the image is already on your local machine, Docker will pull the latest version.

1.5. Run a Container


docker run -d -p 80:80 --name webserver nginx

Explanation:

  • -d: Runs the container in detached mode (in the background).
  • -p 80:80: Maps port 80 on the host to port 80 in the container.
  • --name webserver: Assigns the name "webserver" to the container.
  • nginx: Specifies the image to use.

1.6. Stop a Container


docker stop webserver

Explanation: Stops the running container named "webserver." It sends a SIGTERM signal, followed by SIGKILL after a grace period if the container doesn’t stop.

1.7. Remove a Container


docker rm webserver

Explanation: Removes the stopped container named "webserver." The container must be stopped before it can be removed.

1.8. Remove an Image


docker rmi nginx

Explanation: Deletes the nginx image from your local Docker repository. If any containers are using this image, Docker will prevent its removal unless forced.

2. Dockerfile Basics

A Dockerfile is a script used to automate the building of Docker images.

2.1. Simple Dockerfile

Create a file named Dockerfile with the following content:


# Use an official Python runtime as a parent image FROM python:3.9-slim # Set the working directory in the container WORKDIR /app # Copy the current directory contents into the container at /app COPY . /app # Install any needed packages specified in requirements.txt RUN pip install --no-cache-dir -r requirements.txt # Make port 80 available to the world outside this container EXPOSE 80 # Define environment variable ENV NAME World # Run app.py when the container launches CMD ["python", "app.py"]

Explanation:

  • FROM python:3.9-slim: Sets the base image to Python 3.9 slim version.
  • WORKDIR /app: Sets the working directory inside the container.
  • COPY . /app: Copies files from the current directory to the container’s /app directory.
  • RUN pip install --no-cache-dir -r requirements.txt: Installs Python dependencies listed in requirements.txt.
  • EXPOSE 80: Documents that the container listens on port 80.
  • ENV NAME World: Sets an environment variable NAME with value World.
  • CMD ["python", "app.py"]: Specifies the default command to run when the container starts.

2.2. Build the Docker Image


docker build -t my-python-app .

Explanation: Builds an image from the Dockerfile in the current directory (.) and tags it as my-python-app.

2.3. Run a Container from the Image


docker run -p 4000:80 my-python-app

Explanation: Runs a container from the my-python-app image, mapping port 4000 on the host to port 80 in the container.

3. Docker Compose

Docker Compose is a tool for defining and running multi-container Docker applications.

3.1. Basic docker-compose.yml File

Create a file named docker-compose.yml with the following content:


version: '3' services: web: image: nginx ports: - "8080:80" redis: image: redis

Explanation:

  • version: '3': Specifies the version of Docker Compose syntax.
  • services: Defines the services (containers) to run.
    • web: A service using the nginx image, exposing port 8080.
    • redis: A service using the redis image.

3.2. Start Services with Docker Compose


docker-compose up

Explanation: Starts the services defined in docker-compose.yml. If the images are not available locally, Docker Compose will pull them.

3.3. Stop and Remove Containers with Docker Compose


docker-compose down

Explanation: Stops and removes the containers defined in docker-compose.yml. It also removes the associated networks and volumes.

4. Docker Networking

Docker networking allows containers to communicate with each other and with the outside world.

4.1. Create a Network


docker network create my-network

Explanation: Creates a new network named my-network. Containers connected to this network can communicate with each other.

4.2. Run Containers on a Custom Network


docker run -d --name db --network my-network mongo docker run -d --name app --network my-network my-python-app

Explanation: Runs mongo and my-python-app containers on the my-network network, allowing them to communicate directly.

4.3. Inspect a Network


docker network inspect my-network

Explanation: Shows detailed information about the my-network network, including connected containers and configuration.

5. Docker Volumes

Volumes are used to persist data across container restarts and to share data between containers.

5.1. Create a Volume


docker volume create my-volume

Explanation: Creates a new Docker volume named my-volume. Volumes are stored in a part of the host filesystem managed by Docker.

5.2. Run a Container with a Volume


docker run -d -v my-volume:/data --name my-container nginx

Explanation: Runs a container with the volume my-volume mounted to /data in the container. This allows data to persist and be shared.

5.3. List Volumes


docker volume ls

Explanation: Lists all Docker volumes on the system.

5.4. Inspect a Volume


docker volume inspect my-volume

Explanation: Provides detailed information about the my-volume volume, including its mount point and usage.

5.5. Remove a Volume


docker volume rm my-volume

Explanation: Deletes the my-volume volume. It can only be removed if no containers are using it.

6. Advanced Docker Commands

6.1. Build an Image with Build Arguments


docker build --build-arg MY_ARG=value -t my-image .

Explanation: Passes build arguments to the Dockerfile. You can use MY_ARG in the Dockerfile with ARG directive.

6.2. Tag an Image


docker tag my-image my-repo/my-image:latest

Explanation: Tags an image (my-image) with a new name and tag (my-repo/my-image:latest). This helps in organizing and managing images.

6.3. Push an Image to Docker Hub


docker push my-repo/my-image:latest

Explanation: Uploads the tagged image to Docker Hub or another Docker registry.

6.4. Pull an Image from a Private Repository


docker login docker pull my-repo/my-image:latest

Explanation: Logs into a Docker registry and pulls an image from it. Authentication is required for private repositories.

6.5. Create and Manage Docker Swarm


docker swarm init docker service create --name my-service -p 80:80 nginx docker service ls docker service ps my-service docker service rm my-service docker swarm leave --force

Explanation:

  • docker swarm init: Initializes a Docker Swarm cluster.
  • docker service create --name my-service -p 80:80 nginx: Creates a new service named my-service using the nginx image.
  • docker service ls: Lists all services in the swarm.
  • docker service ps my-service: Lists tasks (containers) of the specified service.
  • docker service rm my-service: Removes the specified service.
  • docker swarm leave --force: Forces the current node to leave the swarm.

7. Debugging and Logs

7.1. View Container Logs


docker logs my-container

Explanation: Displays the logs of the specified container, useful for debugging issues.

7.2. Attach to a Running Container


docker attach my-container

Explanation: Attaches your terminal to the running container’s process, allowing you to interact with it directly.

7.3. Exec into a Running Container


docker exec -it my-container /bin/bash

Explanation: Opens an interactive terminal session (-it) inside the container, allowing you to run commands directly.

This guide covers a broad range of Docker commands and concepts, giving you a solid foundation to work with Docker in various scenarios. 

About Prometheus

 GitHub Link : https://github.com/Naveenjayachandran/Kubernetes_Prometheus

What is Prometheus?

Prometheus is an open-source systems monitoring and alerting toolkit originally built at SoundCloud. Since its inception in 2012, many companies and organizations have adopted Prometheus, and the project has a very active developer and user community. It is now a standalone open source project and maintained independently of any company. To emphasize this, and to clarify the project's governance structure, Prometheus joined the Cloud Native Computing Foundation in 2016 as the second hosted project, after Kubernetes.

Prometheus collects and stores its metrics as time series data, i.e. metrics information is stored with the timestamp at which it was recorded, alongside optional key-value pairs called labels.

For more elaborate overviews of Prometheus, see the resources linked from the media section.

Features

Prometheus's main features are:

  • a multi-dimensional data model with time series data identified by metric name and key/value pairs
  • PromQL, a flexible query language to leverage this dimensionality
  • no reliance on distributed storage; single server nodes are autonomous
  • time series collection happens via a pull model over HTTP
  • pushing time series is supported via an intermediary gateway
  • targets are discovered via service discovery or static configuration
  • multiple modes of graphing and dashboarding support

What are metrics?

Metrics are numerical measurements in layperson terms. The term time series refers to the recording of changes over time. What users want to measure differs from application to application. For a web server, it could be request times; for a database, it could be the number of active connections or active queries, and so on.

Metrics play an important role in understanding why your application is working in a certain way. Let's assume you are running a web application and discover that it is slow. To learn what is happening with your application, you will need some information. For example, when the number of requests is high, the application may become slow. If you have the request count metric, you can determine the cause and increase the number of servers to handle the load.

Components

The Prometheus ecosystem consists of multiple components, many of which are optional:

Most Prometheus components are written in Go, making them easy to build and deploy as static binaries.

Architecture

This diagram illustrates the architecture of Prometheus and some of its ecosystem components:

Prometheus architecture

Prometheus scrapes metrics from instrumented jobs, either directly or via an intermediary push gateway for short-lived jobs. It stores all scraped samples locally and runs rules over this data to either aggregate and record new time series from existing data or generate alerts. Grafana or other API consumers can be used to visualize the collected data.

When does it fit?

Prometheus works well for recording any purely numeric time series. It fits both machine-centric monitoring as well as monitoring of highly dynamic service-oriented architectures. In a world of microservices, its support for multi-dimensional data collection and querying is a particular strength.

Prometheus is designed for reliability, to be the system you go to during an outage to allow you to quickly diagnose problems. Each Prometheus server is standalone, not depending on network storage or other remote services. You can rely on it when other parts of your infrastructure are broken, and you do not need to setup extensive infrastructure to use it.

When does it not fit?

Prometheus values reliability. You can always view what statistics are available about your system, even under failure conditions. If you need 100% accuracy, such as for per-request billing, Prometheus is not a good choice as the collected data will likely not be detailed and complete enough. In such a case you would be best off using some other system to collect and analyze the data for billing, and Prometheus for the rest of your monitoring.

Wednesday, August 9, 2023

What DevOps is About

 DevOps is all about making the process of creating and running software smoother and faster by getting development and operations teams to work better together. The name “DevOps” blends “development” and “operations,” highlighting how these traditionally separate areas come together in this approach.

What DevOps is About

  1. Better Teamwork: DevOps focuses on getting developers and IT operations teams to communicate and collaborate more effectively. This means sharing goals and working together throughout the software lifecycle.

  2. Automation: A big part of DevOps is automating repetitive tasks. This includes things like testing code, integrating changes, and deploying updates, which helps to speed things up and reduce human error.

  3. Continuous Integration and Continuous Deployment:

    • Continuous Integration (CI): This involves regularly adding code changes to a shared repository and running automated tests to make sure everything works well together.
    • Continuous Deployment (CD): This takes CI a step further by automatically deploying code changes to production environments, making it quicker to get updates to users.
  4. Monitoring and Logging: Keeping an eye on how applications and systems are performing is crucial. With continuous monitoring and logging, teams can spot and fix issues faster, ensuring everything runs smoothly.

  5. Infrastructure as Code (IaC): This concept lets teams manage their infrastructure using code. Instead of manually setting up servers and networks, they can define and manage these resources through scripts, making it easier to replicate and manage environments.

  6. Cultural Change: Implementing DevOps often requires a shift in how teams work. It’s about creating a culture where everyone shares responsibility for the entire lifecycle of the software, from development through to operations.

Why DevOps is Beneficial

  • Faster Releases: With streamlined processes and automation, teams can release new software updates more quickly and frequently.
  • Better Quality: Automated testing and integration help catch bugs early, leading to higher-quality software.
  • Increased Efficiency: Automating tasks reduces manual work and operational overhead, making processes more efficient.
  • Improved Collaboration: Teams work more closely together, improving communication and problem-solving.

Common DevOps Tools

  • Version Control: Tools like Git, GitHub, and GitLab help manage code changes.
  • CI/CD Tools: Jenkins, Travis CI, CircleCI, and GitLab CI/CD automate the process of integrating and deploying code.
  • Configuration Management: Ansible, Puppet, and Chef help automate the setup and management of servers and other infrastructure.
  • Containerization and Orchestration: Docker and Kubernetes are used to manage and scale applications in containers.
  • Monitoring and Logging: Tools like Prometheus, Grafana, and the ELK Stack (Elasticsearch, Logstash, Kibana) track and analyze application and system performance.

In a nutshell, DevOps is about improving how software is developed, tested, and deployed by making processes faster, more efficient, and more collaborative.

Thursday, January 5, 2023

Git Operations

 Certainly! Here’s a detailed explanation of each Git operation and command:

1. Basic Git Operations

Initialization and Configuration

  • Initialize a New Repository:


    git init
    • Explanation: Initializes a new Git repository in the current directory, creating a hidden .git directory where Git stores configuration and metadata.
  • Clone an Existing Repository:


    git clone <repository-url>
    • Explanation: Copies an existing Git repository from a remote URL to your local machine, including all its history and branches.
  • Configure Git:


    git config --global user.name "Your Name" git config --global user.email "your.email@example.com"
    • Explanation: Sets up global user information that will be used in commits. The --global flag makes these settings apply to all repositories on your machine.

Basic Commands

  • Check Repository Status:


    git status
    • Explanation: Shows the state of the working directory and the staging area, including which files are modified, staged for commit, or untracked.
  • View Commit History:


    git log
    • Explanation: Displays a list of commits in the current branch, including commit messages, author information, and commit hashes.
  • View a Specific Commit:


    git show <commit-hash>
    • Explanation: Shows detailed information about a specific commit, including changes made and the commit message.
  • List Files in the Repository:


    git ls-tree --name-only <branch-name>
    • Explanation: Lists files in a specific branch. Useful for seeing the contents of a branch without switching to it.

Staging and Committing

  • Add Files to Staging:


    git add <file> git add . # Add all changes in the current directory
    • Explanation: Moves changes in specified files (or all files) from the working directory to the staging area, preparing them to be committed.
  • Remove Files from Staging:


    git reset <file>
    • Explanation: Unstages files that have been added to the staging area, keeping the changes in the working directory.
  • Commit Changes:


    git commit -m "Commit message"
    • Explanation: Saves the changes from the staging area to the repository with a descriptive message.
  • Amend Last Commit:


    git commit --amend
    • Explanation: Modifies the most recent commit. You can change the commit message or add new changes to the commit.

Branching and Merging

  • Create a New Branch:


    git branch <branch-name>
    • Explanation: Creates a new branch with the specified name. This branch starts from the current commit.
  • List All Branches:


    git branch
    • Explanation: Lists all branches in the repository. The current branch is marked with an asterisk.
  • Switch Branches:


    git checkout <branch-name>
    • Explanation: Switches to the specified branch, updating the working directory to match the branch’s state.
  • Create and Switch to a New Branch:


    git checkout -b <branch-name>
    • Explanation: Creates a new branch and immediately switches to it.
  • Merge Branches:


    git merge <branch-name>
    • Explanation: Combines the changes from the specified branch into the current branch. Conflicts may need to be resolved manually.
  • Delete a Branch:


    git branch -d <branch-name> git branch -D <branch-name> # Force delete
    • Explanation: Deletes the specified branch. The -D flag forcefully deletes the branch even if it has unmerged changes.
  • Rebase Branch:


    git rebase <branch-name>
    • Explanation: Re-applies commits from the current branch onto another branch, changing the base of the current branch.

Remote Repositories

  • Add a Remote Repository:


    git remote add origin <repository-url>
    • Explanation: Adds a new remote repository with the given URL, typically named origin. This allows you to push and pull changes from the remote.
  • List Remote Repositories:


    git remote -v
    • Explanation: Lists the remote repositories associated with your local repository and their URLs.
  • Remove a Remote Repository:


    git remote remove <remote-name>
    • Explanation: Removes a remote repository from your local configuration.
  • Fetch from Remote Repository:


    git fetch <remote-name>
    • Explanation: Downloads changes from a remote repository without merging them into the local branch.
  • Pull Changes from Remote Repository:


    git pull <remote-name> <branch-name>
    • Explanation: Fetches changes from a remote branch and merges them into the current branch.
  • Push Changes to Remote Repository:


    git push <remote-name> <branch-name>
    • Explanation: Uploads your local branch commits to the specified remote repository.
  • Push All Branches to Remote:


    git push --all <remote-name>
    • Explanation: Pushes all branches to the specified remote repository.
  • Push Tags to Remote:


    git push <remote-name> --tags
    • Explanation: Pushes all tags to the specified remote repository.

Tagging

  • Create a Tag:


    git tag <tag-name>
    • Explanation: Creates a new tag pointing to the current commit. Tags are often used for marking releases.
  • List Tags:


    git tag
    • Explanation: Lists all tags in the repository.
  • Push a Tag to Remote:


    git push <remote-name> <tag-name>
    • Explanation: Pushes a specific tag to the remote repository.
  • Delete a Tag:


    git tag -d <tag-name>
    • Explanation: Deletes a tag from your local repository.

Undoing Changes

  • Discard Changes in Working Directory:


    git checkout -- <file>
    • Explanation: Discards changes in a file in the working directory, reverting it to the last committed state.
  • Undo Last Commit (Keep Changes):


    git reset --soft HEAD~1
    • Explanation: Moves the HEAD pointer back one commit, but keeps the changes in the working directory and staging area.
  • Undo Last Commit (Discard Changes):


    git reset --hard HEAD~1
    • Explanation: Moves the HEAD pointer back one commit and discards all changes in the working directory and staging area.
  • Revert a Commit:


    git revert <commit-hash>
    • Explanation: Creates a new commit that undoes the changes introduced by a specific commit. This is a safe way to undo changes in a public history.

Stashing

  • Save Changes to Stash:


    git stash
    • Explanation: Temporarily saves changes in your working directory that are not yet committed. Useful for switching branches without committing changes.
  • Apply Stashed Changes:


    git stash apply
    • Explanation: Reapplies stashed changes to your working directory. The stash remains in the stash list.
  • List Stashes:


    git stash list
    • Explanation: Shows a list of stashes that you have saved.
  • Drop a Stash:


    git stash drop <stash@{index}>
    • Explanation: Deletes a specific stash from the stash list.
  • Clear All Stashes:


    git stash clear
    • Explanation: Deletes all stashes from the stash list.

Diffs

  • Show Changes in Working Directory:


    git diff
    • Explanation: Displays changes between the working directory and the index (staging area).
  • Show Changes Between Commits:


    git diff <commit-hash1> <commit-hash2>
    • Explanation: Shows differences between two specific commits.
  • Show Changes Between Staging and Last Commit:


    git diff --cached
    • Explanation: Displays changes between the staging area and the last commit.

Configuration and Settings

  • View Git Configuration:


    git config --list
    • Explanation: Lists all Git configuration settings, including user info and repository settings.
  • Set Git Configuration:


    git config <key> <value>
    • Explanation: Sets a Git configuration setting. You can set user-specific, repository-specific, or global settings.

4. Advanced Git Operations

Cherry-Picking

  • Apply a Commit from Another Branch:

    git cherry-pick <commit-hash>
    • Explanation: Applies the changes introduced by a specific commit from another branch to the current branch. Useful for backporting fixes.

Reflog

  • View the Reflog:


    git reflog
    • Explanation: Shows a log of all reference changes, including commits, checkouts, and merges. Useful for recovering lost commits or understanding recent changes.
  • Recover Lost Commits:


    git checkout <commit-hash>
    • Explanation: Allows you to check out a commit directly, which can be useful for recovering lost changes.

Submodules

  • Add a Submodule:


    git submodule add <repository-url> <path>
    • Explanation: Adds a new Git repository as a submodule within your repository. This is useful for including external projects.
  • Update Submodules:


    git submodule update --remote
    • Explanation: Updates submodules to the latest commit on their respective remote branches.
  • Initialize Submodules:


    git submodule init
    • Explanation: Initializes submodules in a repository after cloning. Required for setting up submodules.

This detailed explanation covers the most common and important Git commands and concepts. If you need further details on any specific command or operation, feel free to ask!

Thursday, March 10, 2022

Uncovering the Good Stuff: Why DevOps Is Awesome


Uncovering the Good Stuff: Why DevOps Is Awesome

DevOps has revolutionized the way companies deliver software, blending development and operations into a seamless workflow that empowers teams, improves efficiency, and accelerates innovation. But what exactly makes DevOps so awesome? Let's dig into the benefits and see why organizations around the world are embracing it.

1. Faster Delivery and Innovation

One of the most exciting aspects of DevOps is its ability to speed up software delivery. By automating processes, improving communication between teams, and enabling continuous integration and continuous delivery (CI/CD), DevOps lets companies ship code faster without sacrificing quality. Here’s why:

  • Shorter Development Cycles: DevOps eliminates bottlenecks between development and operations, allowing for quicker iterations. Teams can continuously build, test, and deploy, bringing new features to market faster.

  • Continuous Feedback: With rapid deployments, user feedback is received sooner, allowing teams to make real-time improvements and adapt to changing customer needs.

  • Increased Agility: By embracing automation and agile methodologies, teams can quickly respond to market trends, technological shifts, or customer demands. This leads to quicker releases and a competitive edge in the market.

2. Higher Quality Products

Speed is great, but only if it doesn’t compromise quality—and that’s where DevOps truly shines. Automation, testing, and monitoring ensure that teams can move fast while maintaining product integrity.

  • Automated Testing: With DevOps, testing happens early and often through CI pipelines, catching bugs and issues before they reach production. This leads to more reliable, bug-free releases.

  • Continuous Monitoring: Tools like Prometheus, Grafana, and ELK (Elasticsearch, Logstash, Kibana) continuously monitor applications for issues. This proactive monitoring allows teams to catch and fix problems before users are affected.

  • Better Collaboration: Since DevOps brings teams together, there’s less finger-pointing and more focus on delivering high-quality products. Shared responsibility leads to improved testing, better code reviews, and ultimately more stable software.

3. Automation: The Secret Sauce

If there’s one thing that makes DevOps awesome, it’s automation. Repetitive, manual tasks can slow teams down and introduce errors. Automating these tasks ensures consistency, frees up valuable time, and allows teams to focus on innovation.

  • CI/CD Pipelines: Continuous integration ensures that every change to the code is automatically tested, while continuous delivery means that tested code can be deployed to production anytime. This allows for "push-button" releases and fewer surprises in production.

  • Infrastructure as Code (IaC): Tools like Terraform and AWS CloudFormation allow infrastructure to be treated like software. By automating the provisioning of servers, databases, and networks, teams can scale applications quickly and with minimal manual intervention.

  • Automated Security: Security checks can be automated as part of the DevOps pipeline, making it easier to spot vulnerabilities early. Tools like Snyk and HashiCorp Vault ensure security is embedded in the development process, not an afterthought.

4. Collaboration and Teamwork

DevOps isn’t just about tools—it’s about creating a culture where collaboration thrives. In traditional settings, development and operations teams worked in silos, which often led to inefficiencies and miscommunication. DevOps flips this model by encouraging cross-team collaboration.

  • Shared Responsibility: DevOps teams are responsible for the entire lifecycle of a product, from development to deployment and beyond. This shared accountability fosters a sense of ownership and ensures that teams are invested in delivering high-quality products.

  • Cross-functional Teams: DevOps encourages forming cross-functional teams where developers, operations, security, and quality assurance work closely together. This reduces handoff delays, enhances knowledge sharing, and accelerates problem-solving.

  • Better Communication: DevOps uses collaboration tools like Slack, Zoom, and Jira to keep everyone on the same page. Frequent check-ins, standups, and retrospectives help teams stay aligned and focused on common goals.

5. Increased Stability and Reliability

DevOps makes it possible to release faster, but it also improves the stability of systems through constant monitoring, automated rollback mechanisms, and thorough testing. This means fewer outages and smoother deployments.

  • Version Control and Rollbacks: Version control ensures every change can be tracked, and if something goes wrong in production, automated rollback processes can restore the system to a previous, stable state.

  • Frequent, Smaller Releases: Instead of pushing large updates all at once, DevOps encourages small, frequent releases, which are easier to manage and monitor. If something goes wrong, it’s easier to pinpoint and fix the issue quickly.

  • Resilience Through Automation: Automated backups, failover systems, and containerization (like Docker and Kubernetes) ensure that applications can recover quickly from failures. This minimizes downtime and ensures higher availability.

6. Cost Efficiency

While DevOps does require investment in tools and training, it saves money in the long run by reducing inefficiencies, lowering downtime, and allowing teams to do more with less.

  • Less Manual Work: Automation reduces the need for manual intervention, freeing up your teams to focus on high-impact work rather than repetitive tasks.

  • Fewer Downtimes: With real-time monitoring, automated testing, and fast rollbacks, issues are caught and resolved early, preventing costly outages.

  • Optimized Resources: DevOps tools enable dynamic resource management, where infrastructure can automatically scale based on demand. This helps organizations avoid over-provisioning and underutilizing resources.

7. Happier Teams

Finally, DevOps creates a more enjoyable working environment. With fewer bottlenecks, less repetitive work, and more autonomy, teams are generally happier and more productive.

  • Less Burnout: Automation takes care of many mundane tasks, so teams can focus on solving problems and building new features rather than fighting fires.

  • Empowerment: DevOps empowers teams to take full control over the development lifecycle, fostering creativity and innovation.

  • Continuous Learning: DevOps promotes a learning culture, encouraging teams to experiment, fail fast, and learn from mistakes. This keeps things exciting and helps build a mindset of growth and improvement.

Conclusion

DevOps is awesome because it transforms how teams work, delivering faster releases, higher quality products, and a more collaborative culture. By embracing automation, breaking down silos, and focusing on continuous improvement, companies can achieve faster innovation, better customer satisfaction, and more resilient systems—all while keeping teams motivated and engaged.